Showing posts with label diy. Show all posts

Sunday, January 3, 2016

BE THE GOOD


When I saw this sign on Pinterest, I immediately wanted it for my home.  With all of the awful things that we see on the news or read in our Facebook feeds, I wanted this simple, yet powerful, message to remind my family each day that there is still good in the world and it starts with them.

In our circle, we are blessed to have friends and family members with all different backgrounds and stories.  They have various religious beliefs, races, ethnic heritages, relationship statuses and sexual orientations.  Right now my daughters are just 3 years old and 9 months old so they are too young to recognize that these differences even exist.  Right now all my girls know is that these people care about us and we care about them.

I am not sure when it will happen but one day my girls will learn that differences do exist.  When that day comes, I want them to already know that different can still be good.  I want them to remember that one person's actions doesn't reflect the way all others think or act.  I want them to remember all the awesome people they have met and continue to BELIEVE THERE IS GOOD IN THE WORLD.  I want this to be instilled in their mind so when the day comes when they hear people saying ugly things about others, that my girls remember to BE THE GOOD. 

This message is such an important one to teach our kids as they grow up in a very different world.  I don't want all of the negativity in the world to drown out the positive.  Luckily for me, the pilot also got excited about having this message on display in our home.  He even did most of the work!

DIRECTIONS
We followed most of the instructions from the Blooming Homestead blog which is where I first saw this quote.  The pilot cut and slightly sanded wood from a pallet.  Then he stained it with leftover stain that he had from another project.  While I didn't download the file that you can access from the blog, I did use her dimensions for the stencils found here.  Instead of using cardstock, I used vinyl rolls in my Silhouette Portrait.  I realize that this was more expensive than cardstock but I wanted to make sure I did it well.
Since I used the more expensive vinyl, I wanted to save some money and not use the roll of transfer paper that I typically use with my Silhouette vinyls.  Instead I used Glad Press'n Seal plastic wrap.
 Together we carefully pulled off the Press'n Seal and laid down the vinyl on the wood.
I then used a vinyl scrapper to smooth out any air pockets.  You can also use a credit card to do the job.
Originally we thought to spray paint it but after discussing it, we wanted the sign to have more character.  One coat of hand painting would provide that look.  I used a flat paint brush and outlined each letter first to provide a nicer edge and then filled it in.
Before the paint could dry completely, I slowly removed the vinyl.  There were some paint that bled past the edges but I just used one of my Silhouette hooks to scratch away the paint.  Overall it turned out great!

Here it is at the top of our stairway, just outside all of our bedrooms. A perfect place for this important reminder.  Along with the cute little reminder of why I want to believe there is good in the world :)


Thursday, July 31, 2014

Map Hearts

Home is where the heart is...

This month the unthinkable happened.  My adventurous friends settled down... in a house... in the suburbs... of Chicago!  While the pilot and I had settled down in our home right after we got engaged, these friends have lived in 10 different cities (6 states) in the last eight years.  That's not including their several-week-long European adventure.   Super cool life, right?!

When I started to think about what to get them for a housewarming gift I initially thought of the usual gift baskets with kitchen utensils, cleaning supplies and wine.  I even placed an order on Etsy for a cool return address stamp BUT cancelled it when I received their Christmas card the next day and saw they already had one.  Don't worry, I got a refund.

Then I had an epiphany and remembered all of the cool map art that I have seen on Pintrest.  I didn't follow any one design, just did it as I went.  Here it is:


I've always loved the look of them but truthfully had no use for because I met my husband in high school in the same town we bought our first home and don't really have any other place of significance.

What other project should I use the book of maps for?

Monday, April 14, 2014

Mounted Photos


Go to www.costcophotocenter.com and upload your photos.  From there you can select what size and what finish you want.  Since the photos would be displayed near my dining room chandelier I wanted to minimize the glare as much as possible so I went with the "lustre" finish.  The prices are amazing.  One 12" x 18" photo only costs $2.99!

While they were printing I went to Lowes and after searching the lumbar section with a Lowes employee I finally selected a packaged piece of presanded solid pine edge-glued panel for $16.97. This wood had a very smooth edge that would look nicer than if we chose an refined piece.  Here is what the label on the package looked like:


They employees there are super helpful and will cut the wood for you, of course for an extra charge.  I was able to get the three sizes I needed (12 x 12, 12 x 18, 8 x 16) and still had wood left over for other projects.

Luckily I had some extra paint from when we did our bedroom so I used that to paint the edges and just around the corner in case the photo didn't line up exactly.

Once it was dried I had Adam hammer a wall hook onto the back to make it easy to hang.  I'm a huge klutz so I leave all hammering for him to do.

Then with my heavy duty spray adhesive, I simply sprayed the back of the photo and the wood.  After 30 seconds I carefully lined up the photo with the wood and slowly pressed it down, going left to right.  Take your time with this step!

Voila!  It is finished.  Here is the final cost of this project:

$8.97 - Three photos at $2.99 each
$16.97 - Wood
$5.95 - Spray Adhesive
Free - Paint
= $31.89 / 3 photos = $10.63 each

Friday, August 31, 2012

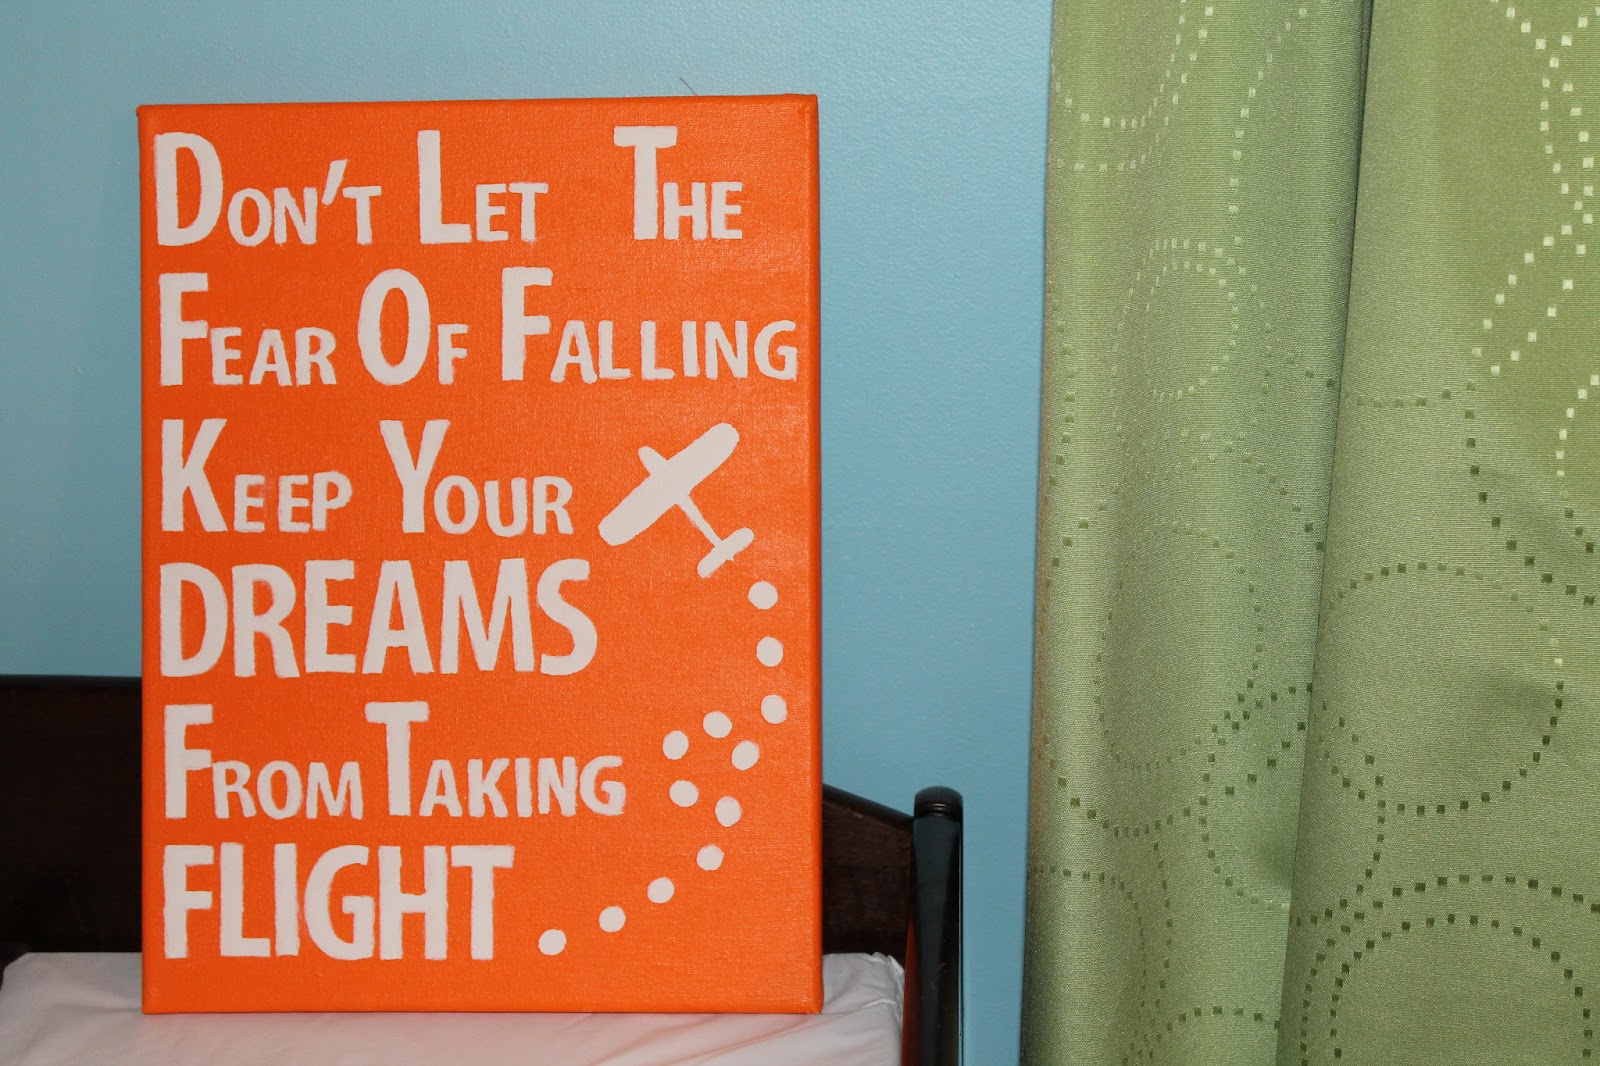
Custom Quote Wall Art

I really adore wall art in nurseries but it has been difficult for me to find pieces I love.  Unfortunately most of the airplane items I found for the nursery were way boyish so I decided to incorporate a plane in a gender-neutral way and I love it!

I was inspired by Brandy from the Heart and Habitat blog.  Here is her version of wall art that she painted with her kids, so cute!
Heart and Habitat Blog

First I bought a blank canvas at JoAnn Fabrics that was 50% off.

Since I don't have a Cricut, I had to use store bought vinyl letters which worked out perfectly with the sizes I needed.  It was tricky to find them at JoAnn Fabrics and I grabbed the only pack in stock but some other crafting stores may have more options.

After finding the quote I wanted, I cut out each letter (not precisely but enough to know the size of the letter) and arranged the quote the way I wanted it to read.

Because I wanted things to be symmetrical, I measured out lines with a ruler and pencil so that they were evenly spaced out.  Once that was finished I peeled off the vinyl backing and placed the stickers onto the canvas.  DO NOT DO THIS.  Unfortunately the paint was not dark enough to cover up the pencil lines so I highly suggest that you use painter's tape to map out the lines and remove as you do each line.
For the airplane, I just printed off an image online and traced it onto a sheet of contact paper I bought at Goodwill for $0.49!  For some reason they always have tons of contact paper so I was excited to finally have a reason to buy it.

Then I painted over it.  The orange is one of my favorite accent colors in the nursery!  As mentioned before, the pencil was showing through so I had to do 4 coats of paint to make sure to cover it up.  Without the pencil, I think I could have gotten away with only 2 coats.

Once it was dried, I peeled off each letter.  The paint bled through a little around the edges so I just touched up each letter by hand using white paint.
 

That's it.  The quote is in honor of the pilot. He's been through a challenging, stressful, long journey being a pilot that has even forced several of his friends to completely change careers.  Pursuing his dreams has taken a lot of patience, discipline and risk but it hasn't stopped him.  It's awesome to have a quote that we not only believe, but actually live by.

By the way, I started this project on one of my craft nights with one of my best friends Lauren.  She started her own blog The Lovely O.T. with some really great projects so be sure to check it out!

Tuesday, February 28, 2012

DIY Nightstand


After the pilot felt how great it was to complete a DIY project with his Vintage Steamer Trunk, he was hooked on carpentry.  I knew I had to take advantage of this moment so I started showing him all of my Pintrest boards to help him with ideas.  The next project he completed was an awesome upholstered headboard and footboard.  That will be another post on another day, I promise.

The new bed directed our focus onto the entire bedroom and we realized we needed some change.  We moved in almost four years ago and our bedroom is still white with random pieces of second-hand tables.  I've always wanted a real grown-up bedroom set so now we were finally on our way.

After the bed was finished, we bought new bedding with some fun decorative pillows.  Then it was apparent that we needed new nightstands and Adam was up for the carpentry challenge.  After perusing a few bloggers I came across Ana White's blog and found the most perfect plans for our nightstands.  I won't try to recreate the instructions but here are a few photos of his work.


Here is the finished product in my bedroom.  Total cost for two nightstands was about $150.  While it is not a cheap project it is much cheaper than it would be buy in the store. 
He even added a shelf inside to hid all of our crap that used to be exposed.  Seriously these nightstands have been such a blessing to help give us storage while keeping our bedroom tidy.

Once the bedroom makeover is complete I will show you the photos of the whole room.  The before and after will be completely different!  I cannot wait for it to be finished :)

Sunday, February 12, 2012

DIY Vintage Steamer Trunk


The pilot was promoted to captain, hooray!  This means that his training period has given him longer spurts of time at home... alone... while I am at work.  This resulted in a very bored husband.  Since I am a pro at spending time by myself I shared my secret remedy to boredom: create something!  (Ok, so it is probably not a secret since I have a blog on the world wide web devoted to creating things but somehow it was magical when I shared this idea with him.)

We bounced around a few Pintrest inspired projects: dollhouses for our nieces, bed headboard, upcycling extra tables, entryway shelf, etc.  Then he looked around and saw all of my sewing stuff laying around and realized we had an immediate need for more storage.   He settled on a vintage looking steamer trunk.
To be honest, once he had the idea in his head the pilot started the project and did not stop until it was finished.  Even though he didn't bother to write down the steps he did, I am very proud to say that he did remember to take a few photos along the way...
Luckily he had access to use his dad's man cave / garage / workshop.
40% coupon to JoAnn Fabrics hook-up for the feux leather :)

Only had to stain the two sides because he used spray adhesive for the leather and then stapled it to the other two sides.
These would be used to cover the staples and finish the edges.
Close-up of the brass hardware he bought online.

Regular men's belts from JCP.  Great idea, right?!

And now the (very beautiful) finished product...

He's hooked and now wants to make more.  The awesome thing about these is that each one will be unique with a different size, different wood stains, different hardware, different leather and details, etc.  Can't wait to share with you his other creations!  He asked if this project was "Grounded Wife worthy?"  Absolutely dear :)

Thursday, February 2, 2012

DIY Eye Mask

I am not one of those people who makes a big deal out of their birthday, partly because I am the absolute WORST when it comes to remembering other people's birthdays.  Seriously ask my friends and family.  Facebook has made me a better friend for the pure fact that it reminds me of people's birthdays.

So when my BFF's were planning a "girl's weekend away" it was just by chance that my birthday weekend was the one we could all fit into our schedule.  That means that tomorrow morning I will be on a plane to Nashville with my four dearest girlfriends (one even flew in from San Diego!) and we will be headed for a super fun weekend... which will just happen to include using my birthday as another reason to celebrate.

Well I always have trouble sleeping places other than my own bed so I have always used a sleeping mask to help.  That was until two years ago when my adorable puppy, Milo, was the devil and chewed it apart.  So for this awesome trip to "Nashvegas" I knew I would need to get some quality sleep in and decided it was time to make myself a new sleeping mask.

First cut 2 pieces of fabric so it is 4.5" tall and about 10" wide and place on top of one another with right sides together.  (These photos are from my first attempt which resulted in a smaller mask than I wanted so don't compare the sizes to the grid on the mat.) The fabric is totally up to you but I used one piece of cottom with a design and the other piece was a solid-colored silky fabric. 
Fold in half and draw the shape you want your mask to be.  It should take up most of the fold.  Cut along the lines and lay flat.  Personally I like folding my material when I cut so it is symmetrical. 

Take an elastic band and measure it from one of your temples, wrap around the back of your head and to the other temple.  Just think about how tight you want this thing on your head.  Place the elastic in between the two fabrics and have 1" stick out.  Pin down those two end to the mask like shown in the photo below.  Pin the 2 pieces of fabric together.


Sew around the border leaving a 1/4" allowance.  Make sure to sew back-and-forth over the elastic pieces to really secure them in.  Also leave a 1" opening.  Here is a (blurry) photo of the mask sewn with the 1" opening.
Simply turn the fabric inside out.  Use a crochet hook if you need help pushing it through.
Now here is another choice you have.  Personally I like there to be a little more pressure on my eyes so I filled my mask with pillow stuffing that I had left over from another project.  However the pilot requested (yes, he got one too) that his be left flat.  Do as you choose and just hand sew the opening shut.  If you want you can also top stitch it but I left it as is.

And here is the pilot taking in a nap with his flat mask :)
After my fun filled weekend I will show you another DIY project that I am using on my trip.  Stay tuned :)

Tuesday, January 24, 2012

DIY Chalkboard Clips

During the holidays I was looking for the perfect hostess gift.  While shopping at a department store I saw these really cute mini chalkboard clips.  The idea is to clip them onto your servingware to identify the dish.  They sold in a package of 6 for $10 so I bought them.

Then once I got home I looked at them closely and realized... wait a second, I can make these for much cheaper!  So I did what every other Pintrest-addict does, or at least wants to do, and recreated the product myself.

In addition to the glue gun, here were the essentials:

I was really planning on using my chalkboard spray paint on mini wooden rectangles but was lucky enough to find mini-chalkboards at the craft store.  Anytime I can find a more efficient way to do a project, I'm on it!  Now since they were already chalkboards I used blue painting tape to cover the chalkboard as I painted the wooden parts gold.  Then I painted the wooden clips gold.  After two coats they were ready to be glued together.
Really I just removed the blue tape, hot glued the boards to the clip and they were done.  Ta-da!  I had created a really great hostess gift for the fraction of the cost.


What I liked even more about them as a gift is that I used them for the appetizer I brought to the party and then left them for the hostess to use at future dinner parties.  That way she was able to see how great they are in action and hopefully they don't sit packed away.  Of course the DIY Chalkboard Platter that I made doesn't hurt the look either :)

*Note: when using your own chalkboard paint, condition the surface by taking the side of the chalk (long side) and chalk up the whole thing.  Then just wipe it off.  This will make it easier to erase marks in the future.  Otherwise the initial marks may stay.

Sunday, January 22, 2012

DIY Cardigan


DISCLAIMER: I am still completely new to sewing so I do not know all of the technical names for sewing techniques.  Plus I did not follow any patterns or tutorials so this is truly my interpretation of a DIY cardigan.  I simply took one that I already owned, analyzed the stitching and attempted to recreate one similar.   Hopefully I can explain it enough for you to get the idea.

First you are going to trace one of your tank tops to cut out the back of your cardigan.  (You will see in the photo below that I used a sleeveless shirt but the shoulders are longer than I wanted and ended up being more of a cap sleeve.  That’s why I recommend a tank top.) 

To make things symmetrical I have found that it is best to fold the fabric and your stencil (today it’s the tank top) so that you are cutting both sides at once.  Now I wanted this cardigan to be longer than my tanks and tees so I added a few more inches to the bottom.  Cut around the tank and make sure you are always giving yourself at least a ¼ inch allowance.

Now cut out another piece the same size and shape.  Once you do that, slice the second piece (only) right down the middle starting at the middle of the neck.  This gives you the back and the front two panels.  Just think of a cardigan.

With right sides together, sew along the shoulder tops and the sides.  Be sure to keep an opening where the arms will go and where the neck will be.  I wanted it more flowing in front so I left a little on top dangling off.  Now you have something that looks like long vest.

To add more of that flowing look that I wanted, I cut two pieces 6” wide and the length of the cardigan measured from the middle of the neck.  Fold the pieces so that they are 3” wide and stitch the ends of the two pieces together on one side.  Now it creates one long piece that is only 3” wide.

With the right sides together, place the middle of the long piece (where the two pieces were stitched together) and pin it to the open edges of the “vest.”  Then just stitch along that edge, giving yourself a ¼ inch allowance.

Once you turned it inside out, it should look like this.
Fold fabric long enough for your arm.  Make sure you add a few inches for “just in case” or if you are like me, you will want to fold the sleeves back.  Measure the armhole you have in your “vest” and use that to figure out how wide you want to stitch that end of the sleeve.  Mark it on the sleeve fabric.  Then determine how wide you will need your sleeve opening at the end where your hand will come out and mark it.

With right sides together, stitch up along the markers you made and trim the extra fabric.  To keep the sleeves the same size, just place the finished one on top of the other fabric and mark the same spots.  Again, with right sides together, stitch up along the markers you made and trim the extra fabric.
Take the wider side of the sleeve and pin it to the arm opening. ( I’d like to say “OBVIOUSLY with right sides together” but it apparently wasn’t that obvious to me as I first sewed my sleeve inside out.   I’m still learning alongside you folks and will let you know when I make mistakes.)  So…  just make sure that the seams are hidden when the cardigan is on.

To finish off the bottom, measure the distance you want from the bottom of the armpit down the side seam, fold the fabric up and mark with a pin.  For my cardigan, I marked it 19” down.  Once I folder the fabric at each seam I used a ruler to line the two sides up to fold the middle and gave myself a few more pins.

I wanted the flowing part to be longer in front but after I took the photos I realized that I wanted to trim them a bit but still keep them long.  Regardless, it is your choice if you want the front to be straight across or if you want longer fronts.  This is YOUR sewing project so make it how you want it. 

Just top stitch the bottom fold all around to make a nice finish and trim the excess fabric.  I am still contemplating if I will finish off the ends of my sleeve, but I left them long and just folded them over.  The fabric I used is a stretchy, soft fabric so I like burrowing my hands in them to keep warm.
I really love my new cardigan and will definitely make a few others.  While my tutorial may not have been the easiest to follow (and I apologize for that) BUT I just hope it inspires you to try a piece of clothing.  I’ve heard from many of you with sewing machines that you only do pillows or hem pants because clothing seems intimidating.  Really just go to your closest and take out one of your shirts, turn it inside out and check out the stitches.  You will realize there is not much to it and if you used that shirt as your “pattern” you already have the measurements to make it the perfect size for you.  If you are inspired to try a new sewing project, come back to this post and let me know!
Related Posts Plugin for WordPress, Blogger...