Friday, August 31, 2012

Custom Quote Wall Art

I really adore wall art in nurseries but it has been difficult for me to find pieces I love.  Unfortunately most of the airplane items I found for the nursery were way boyish so I decided to incorporate a plane in a gender-neutral way and I love it!

I was inspired by Brandy from the Heart and Habitat blog.  Here is her version of wall art that she painted with her kids, so cute!
Heart and Habitat Blog

First I bought a blank canvas at JoAnn Fabrics that was 50% off.

Since I don't have a Cricut, I had to use store bought vinyl letters which worked out perfectly with the sizes I needed.  It was tricky to find them at JoAnn Fabrics and I grabbed the only pack in stock but some other crafting stores may have more options.

After finding the quote I wanted, I cut out each letter (not precisely but enough to know the size of the letter) and arranged the quote the way I wanted it to read.

Because I wanted things to be symmetrical, I measured out lines with a ruler and pencil so that they were evenly spaced out.  Once that was finished I peeled off the vinyl backing and placed the stickers onto the canvas.  DO NOT DO THIS.  Unfortunately the paint was not dark enough to cover up the pencil lines so I highly suggest that you use painter's tape to map out the lines and remove as you do each line.
For the airplane, I just printed off an image online and traced it onto a sheet of contact paper I bought at Goodwill for $0.49!  For some reason they always have tons of contact paper so I was excited to finally have a reason to buy it.

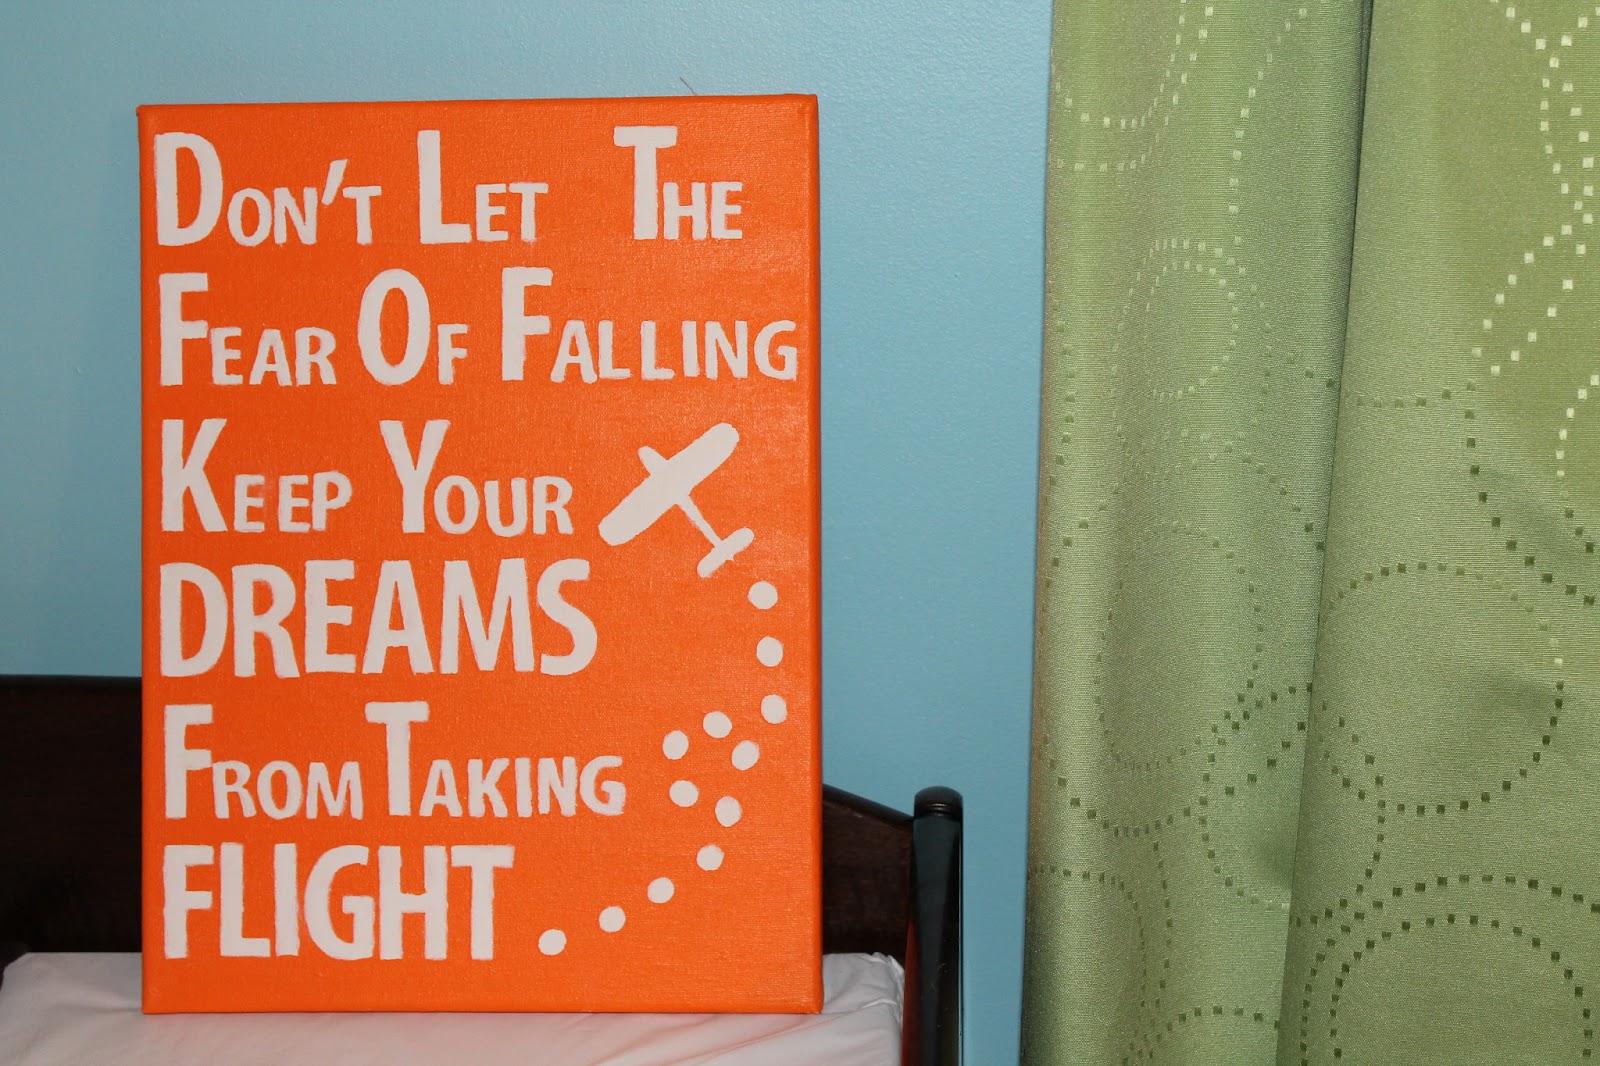
Then I painted over it.  The orange is one of my favorite accent colors in the nursery!  As mentioned before, the pencil was showing through so I had to do 4 coats of paint to make sure to cover it up.  Without the pencil, I think I could have gotten away with only 2 coats.

Once it was dried, I peeled off each letter.  The paint bled through a little around the edges so I just touched up each letter by hand using white paint.
 

That's it.  The quote is in honor of the pilot. He's been through a challenging, stressful, long journey being a pilot that has even forced several of his friends to completely change careers.  Pursuing his dreams has taken a lot of patience, discipline and risk but it hasn't stopped him.  It's awesome to have a quote that we not only believe, but actually live by.

By the way, I started this project on one of my craft nights with one of my best friends Lauren.  She started her own blog The Lovely O.T. with some really great projects so be sure to check it out!

Tuesday, August 14, 2012

Nursery

With less than 100 days to go until Baby Crabb arrives, the pilot and I are doing our best to get things done around the house.  Our number one priority is the nursery.  While many people have informed me that baby probably won't even sleep in the nursery for a few months so we have more time, we are too gosh darn excited and love working on our baby's room.

Everyone has been asking us what the theme is.  Well, I am a brat and do not like any of the gender neutral crib sets, plus the items included in them are practically useless (bumper, comforter, etc.) but that is another topic.  So we decided to go with a "you are my sunshine" meets "airplane" room with bright colors that will work for a boy or girl.

Here are some photos we found online that gave us inspiration:

Blue walls with cloud decals...
http://www.roommatesdecor.com/walldecals/white-clouds-wall-decals.aspx

 But a brighter blue color like this...

http://www.ontobaby.com/


 And one yellow wall with a decal "You Are My Sunshine" that the crib will be on...
http://www.amazon.com/gp/product/B004P2LNZU?ie=UTF8&sn=Wheeler3Designs&seller=AM7Y85KR7NTHB

 Except, it will be a brighter yellow like this...
http://gallery.apartmenttherapy.com/photo/oh-leighton-tour/item/132846

And finally bright lime green and orange accents.
http://www.roomzaar.com/rate-my-space/Nurseries/Babys-first-little-place/detail.esi?oid=23695749

Of course, we will sprinkle in airplane stuff throughout. Since we are going rouge on the "theme," it has been difficult to find things that fit into the room that are gender neutral.  Ok, maybe the real reason it is a difficult task is because I am picky.  Nonetheless, I found that the best thing to do was to create pieces myself.  I will keep you posted on some of our projects as we go!

Sunday, May 13, 2012

I'm back! And with some news...

After a 2 month hiatus, I am back and plan to be back for good.  It probably wasn't the best idea to just completely disappear from the blog world right as I was picking up momentum BUT I like to think that I had a very good excuse.

When I decide to do something I become completely obsessed with it.  I think about it day, night and even in my dreams.  I do a ton of research on the subject and it is all that I seem to talk about in conversations with people who probably don't care.

Well that was exactly what happened in March when I found out some news that would would change my life forever.  It is a personal thing that I have only shared with my immediate family and closest friends.  It's come to a point where I feel it is only right to now share the information with my readers.  Well here it goes...

This next Thanksgiving, I will have something extra to be grateful for because I will not only be the Grounded Wife but the Grounded Mom.  Yes, the pilot and I are having a baby!  LBC (what my in-laws have already started to call the baby, short for "Lil Baby Crabb") will be due the week of Thanksgiving, which is also the same week as the Pilot's 30th birthday.  We are beyond thrilled!


For those of you who are moms, you can understand that during this first trimester I have done everything in my power to keep my eyelids open.  I feel like I have been sleep walking for the past 3 months.  That being said, I had zero energy to come home and do any projects, take photos and write.  The miniscule amount of energy I did have was spent reading up on the gazillion pregnancy books I inherited from my sister-in-law and bought from Goodwill.

I'm excited you finally know and now I can get back in the swing of things and share them all with you.  All of the plans I had in mind for our condo are now accelerated as we prepare to make it a home for 3.5, our dog Milo being the half.

Looking forward to hearing your suggestions on budgeting with a baby, decorating the nursery and any great baby sewing projects you have.  Please share!

Wednesday, March 7, 2012

Guilt-free Broccoli Mac & Cheese


I know, you are probably skeptical because I called it  "guilt-free" and that typically means that it does not taste good but hear me out.  You have seen recipes for macaroni and cheese that are to-die-for.  Ones that have butter or beer, maybe some greasy bacon and lots of cheese.  Well this is not one of those recipes.  Instead, this is a recipe that will NOT make your wallet or gut feel guilty.
Ingredients
  • 1/4 box of elbow macaroni pasta (I used Ronzoni Smart Taste - really good!) 
  • box of frozen Green Giant Broccoli and Cheese Sauce
  • Hormel Real Bacon Pieces (50% Less Fat)
  • Garlic Powder
  • Parmesan Cheese
Dump the macaroni into a pot of boiling water.

At that time microwave the broccoli according to directions.  It's awesome because it will take the same amount of time.  It's even more awesome because for those of you on Weight Watchers, check out the points plus in the upper right-hand corner.  Plus they go on sale as 10 for $10 every couple weeks so it is super cheap to make.

Now, it is easy.  Strain the pasta, dump in the broccoli and cheese sauce and mix.  Sprinkle in some bacon pieces, garlic powder and top with some Parmesan cheese.

In my mind this is the ULTIMATE recipe because:
  1. it is quick (less than 10 minutes!)
  2. it is easy (boil water and microwave)
  3. it is light (low in WW points plus) 
  4. and it is very cheap (less than $2)
Hope you appreciate this recipe as much as I do!

Sunday, March 4, 2012

Cleaning Black Utensils

When I am cooking it is like a happy scene in a romantic movie.  I gracefully move around the kitchen with music in the background and a glass of wine in my hand.  Grinning ear-to-ear I am measuring, chopping, mixing, and doing it all with my nice utensils, cutlery, and cookware.   Then I reach for my spatula and the music stops.  Ugh... these utensils ruin my vibe with their ugly grey stains.

I used to hand wash them but as time went on they found themselves in my dishwasher.  That's how they ended up looking like this. Eventually enough was enough and I had to find a way to clean these things.

First I tried a mix of baking soda and water to clean them.  It did absolutely nothing and was a huge let down.  Then while I was cleaning my dishwasher with a cycle with vinegar I thought... why not try this on the utensils?  Well, it worked!  All I did was soak them in white vinegar for about 30 minutes and then rinsed clean.

I now present to you black plastic utensils free of water stains...

(Don't worry... the white vinegar didn't make the utensil change shape, I just forgot which two I took the before photos of.)

White vinegar has become my newest best friend and I've used it to clean several surfaces now.  It will definitely be on my bulk shopping list the next time I go to Costco.

Tuesday, February 28, 2012

DIY Nightstand


After the pilot felt how great it was to complete a DIY project with his Vintage Steamer Trunk, he was hooked on carpentry.  I knew I had to take advantage of this moment so I started showing him all of my Pintrest boards to help him with ideas.  The next project he completed was an awesome upholstered headboard and footboard.  That will be another post on another day, I promise.

The new bed directed our focus onto the entire bedroom and we realized we needed some change.  We moved in almost four years ago and our bedroom is still white with random pieces of second-hand tables.  I've always wanted a real grown-up bedroom set so now we were finally on our way.

After the bed was finished, we bought new bedding with some fun decorative pillows.  Then it was apparent that we needed new nightstands and Adam was up for the carpentry challenge.  After perusing a few bloggers I came across Ana White's blog and found the most perfect plans for our nightstands.  I won't try to recreate the instructions but here are a few photos of his work.


Here is the finished product in my bedroom.  Total cost for two nightstands was about $150.  While it is not a cheap project it is much cheaper than it would be buy in the store. 
He even added a shelf inside to hid all of our crap that used to be exposed.  Seriously these nightstands have been such a blessing to help give us storage while keeping our bedroom tidy.

Once the bedroom makeover is complete I will show you the photos of the whole room.  The before and after will be completely different!  I cannot wait for it to be finished :)

Wednesday, February 22, 2012

Preventing Lost Socks

Growing up I was never scared of monsters living in my closet or hiding under my bed.  But I did really hate that one particular monster that always pissed off my mom and probably pissed off your mom too.  You know, the monster who lived in our dryer and ate our socks.  At least that's who my mom always blamed when she returned our clean laundry only to find a few lonely socks missing their twin.

I always used to think it was the dryer at my parent's house, like maybe it had a a secret compartment that I never saw and the socks got sucked into it.  Then once I moved out I realized that it is an epidemic everywhere. The pilot gets annoyed that I always buy new socks with different patterns because then it decreases the chances of matching them up.  That leaves us with these two fabric bins full of lonely socks in our laundry room waiting for their perfect match.

While perusing the aisles at the Dollar Tree, one of the last remaining dollar stores where everything is still only $1, I saw a box with 2 delicate zippered laundry bags.  Immediately I realized that this would be a perfect solution for my socks.  After bringing them home I stored one in my night stand so it would be out of sight, surprisngly the neon green does not match my bedroom decor, and it would be a practical spot because I always remove my socks right before bed.  From then on I would take off my socks each night and put them in this mesh bag.

Once the bag was filled enough I zippered it up and threw it in with a load of laundry.  After a cycle in the dryer, I unzippered the bag and it was easy to match up.

Ta-da!  No more lonely socks.  I just wish I had thought of this sooner.  Hey dryer monster - suck it :)

Monday, February 20, 2012

WW Italian Vegetable Soup

This recipe calls for a delicious variety of Italian vegetables and greens that give this meatless soup lots of flavor. 


The pilot is still home so we have been really spoiling ourselves with food and drinks.  Yesterday was my only day off, and it was a gorgeous one, so we thought it was a brilliant idea to go to Hooters and enjoy some (or many) drinks and fried foods.  I am pretty sure that the calories I consumed yesterday alone equate to the amount I should digest for one whole week.

That being said I am feeling the need to make one big batch of soup that will provide me with light lunches for the week.  I found this recipe on the Weight Watchers website and it is ONLY 1 point plus per serving.  If you are unfamiliar with WW, just know that it is really good for you :) 

Ingredients


I followed the recipe exactly except that I used the small tri-colored sweet peppers instead of just one red.  I've been buying those bags from Costco, Aldi and Trader Joe's and try to incorporate them into recipes when I can.  They're just so pretty!

After you chop everything up... it is not a quick recipe to prep... dump it all in a soup pot except for the basil and parsley.

Cover the pot, cook on high and bring to a boil.  Once you reach a boil lower the heat and let it simmer for 10 minutes.

Then simply add the basil, parsley, salt and pepper.  If you're looking for something heartier you can add some cannellini beans or some orzo pasta.  Either way, it's a tasty and light guiltless soup - enjoy!

Wednesday, February 15, 2012

Spinach Nachos

My best friends will laugh at this understatement... I love nachos.  Seriously, chips and melted cheese is a big time weakness for me and we have had a long time love affair.  I was even told by a guy, okay a boy in high school, that one of the reasons he was dumping me was because I ordered nachos at the movies and the crunching was too loud.  It's okay though.  Nachos are still providing joy to my life.

Now that I spend most nights making dinner for one, I often take shortcuts and spare myself the work that goes into cooking/cleaning.  This usually results in me whipping up some quick nachos.  To make nachos an acceptable meal for dinner (a few nights in a row!) I find creative ways to make it a unique and tasty dish.  I always start with the same base of tortilla chips but mix up the toppings.

This recipe is based off a meal that my mom except she would bake them on flour tortillas.  Since I am impatient when I get home, and I love the crunch of a good nacho, I adjusted the recipe so it could be microwaved on tortilla chips.

First you chop up fresh spinach, add chopped garlic, drizzle a little olive oil and sprinkle a little salt and pepper.

Mix it all up in a bowl so that all of the spinach has a little oil on it and spread on top of tortilla chips.

Add some shredded mozzarella cheese (I used reduced fat), microwave just enough for the cheese to melt.  It varies based on microwaves, but for me it was 40 seconds.  After that I sprinkle a little crushed red pepper to add some more kick and you're done!

Do you have any fun nacho recipes that you make?

Sunday, February 12, 2012

DIY Vintage Steamer Trunk


The pilot was promoted to captain, hooray!  This means that his training period has given him longer spurts of time at home... alone... while I am at work.  This resulted in a very bored husband.  Since I am a pro at spending time by myself I shared my secret remedy to boredom: create something!  (Ok, so it is probably not a secret since I have a blog on the world wide web devoted to creating things but somehow it was magical when I shared this idea with him.)

We bounced around a few Pintrest inspired projects: dollhouses for our nieces, bed headboard, upcycling extra tables, entryway shelf, etc.  Then he looked around and saw all of my sewing stuff laying around and realized we had an immediate need for more storage.   He settled on a vintage looking steamer trunk.
To be honest, once he had the idea in his head the pilot started the project and did not stop until it was finished.  Even though he didn't bother to write down the steps he did, I am very proud to say that he did remember to take a few photos along the way...
Luckily he had access to use his dad's man cave / garage / workshop.
40% coupon to JoAnn Fabrics hook-up for the feux leather :)

Only had to stain the two sides because he used spray adhesive for the leather and then stapled it to the other two sides.
These would be used to cover the staples and finish the edges.
Close-up of the brass hardware he bought online.

Regular men's belts from JCP.  Great idea, right?!

And now the (very beautiful) finished product...

He's hooked and now wants to make more.  The awesome thing about these is that each one will be unique with a different size, different wood stains, different hardware, different leather and details, etc.  Can't wait to share with you his other creations!  He asked if this project was "Grounded Wife worthy?"  Absolutely dear :)

Friday, February 10, 2012

Polish Pizza

Yes, you read that correctly.  Polish Pizza.  After a trip to my favorite post-drinking pizza place in Wrigleyville, Ian's Pizza, the pilot and I were inspired to see what type of magnificent creations we could come up with based on the old traditional pizza pie concept.  This challenge started about a year ago and through trail-and-error have found some really tasty and innovative pizza recipes.  This particular recipe is one of our favorites, based off of the pilot's favorite comfort food: polish sausage and sauerkraut.

Start with the pizza crust.  To save time, and spare yourself from having to clean, you may get an already made crust.  If you are willing to do a little extra work for a little extra delicious taste then just go to Trader Joe's and pick up a bag of their ready-to-go pizza dough and roll it out.


After he spread the dough on a lightly greased baking sheet he spread ground mustard and topped with some shredded Swiss cheese. I prefer the taste of ground mustard but you could substitute it for your favorite mustard that you would normally use with your Polish sausage. 

To save time he bought already cooked kielbasa.  To save us some guilt he bought the turkey version.  What a great husband :)

He chopped up the turkey kielbasa, spread it around the pizza and topped with a layer of canned (but drained) sauerkraut.

It's looking yummy, right?!  Well all it needs is a final layer of Swiss cheese and to be baked according to the directions for your crust.  For us it was 17 minutes at 400 degrees.  The sausage is already cooked so as soon as the crust is done and the cheese is melted to your preference, you are ready to chow down!

This is a really delicious dinner that is fun and impressive to guests.  You could even use it as an appetizer if you just cut into small slices.  Definitely one of my favorite dinners that the pilot makes me, thanks dear :)

Related Posts Plugin for WordPress, Blogger...